Quickly learn how to free up storage space on your iPhone 6, iPhone 6S, and iPhone 6S Plus by permanently deleting videos. In less than 2 minutes, this iPhone tutorial explains in plain English how to empty the “recently deleted” album to free up storage space on your iPhone. This is a big problem for owners of 16GB iPhones, which don’t have much storage space to keep lots of live photos and videos. The narrator of the iPhone tutorial is Ian Lamont, author of iPhone 6 & iPhone 6S In 30 Minutes.
The Apple Watch is a timekeeping device with many additional features, including the ability to run miniaturized apps. It requires a paired iPhone to work. This may sound like a pain, but it actually enables new capabilities for iPhone owners, such as:
- Capturing more accurate health data for iPhone fitness apps.
- Using Apple Pay on the Apple Watch.
- Having emails, texts, and social media alerts appear on the Apple Watch.
- Automatically logging into your laptop or desktop computer running macOS.
There are many more capabilities—Apple claims thousands of apps have been created for the Apple Watch, plus integration with all kinds of services.
Pairing uses Bluetooth or Wi-Fi. The Apple Watch app on your phone lets you sync data and activate various features and apps for the Apple Watch. As Apple Watch is a separate product that goes beyond the scope of this guide, I recommend you visit apple.com/watch for more details.
The following post about the iPhone Personal Hotspot feature is excerpted from the book iPhone 6 & iPhone 6S In 30 Minutes by author Ian Lamont.
One of the most useful wireless features on new iPhones is Personal Hotspot, which turns your iPhone into a Wi-Fi access point. This iPhone Personal Hotspot feature is extremely helpful when you are on the road and no public Wi-Fi access is possible for your laptop. As long as your iPhone has a strong carrier signal, the laptop can connect to your iPhone and use the phone’s signal to connect to the Internet. This post describes how to use iPhone Personal Hotspot. It includes a short video at the bottom of the post.
How to set up your iPhone Personal Hotspot
Here’s how to set up your iPhone’s Personal Hotspot:
- Go to Settings > Personal Hotspot and turn it on using the toggle.
- The phone will display a “Now discoverable” message and a Wi-Fi password. You can change the password to something that’s easier to remember by tapping it.
- Go to the laptop (or other device you are using), turn on Wi-Fi, and look for the iPhone using the name of the phone (displayed on the Personal Hotspot screen).
- Connect to the phone, and enter the password provided on the Personal Hotspot screen.
- When the status bar at the top of the phone’s screen displays, “Personal Hotspot: 1 Connection,” it’s ready to use. Even if the phone turns off, the connection will still work.
It is also possible to use Bluetooth to connect your laptop or computer to your iPhone. However, Bluetooth requires pairing and the range is limited. Stick with Wi-Fi if you can.
 If you use the iPhone Personal Hotspot feature, you will use up your monthly carrier data allotments, perhaps even faster than you normally would. Why? Laptops and tablets allow for easier multitasking and downloading of rich media content. As an alternative, some carriers and Internet providers have set up free Wi-Fi access points in public places for their customers. You’ll need your account username and password to connect, but it provides a cheaper alternative.
Video: How to set up your iPhone’s Personal Hotspot
The following post about iPhone security features is excerpted from the book iPhone 6 & iPhone 6S In 30 Minutes by author Ian Lamont. It is not intended to be a comprehensive list.
iPhones have loads of security features built into the operating system as well as individual apps and services. The devices are so secure that U.S. law enforcement officials have complained that they can’t easily bypass their encryption and other security features.
List of iPhone security features
Here is a list of general iPhone security features, as well as privacy features:
- Apps are forced to ask for permission before accessing your location data, photos, or contacts.
- All photos, documents, and other data stored on iCloud is encrypted using the same technology used by major financial institutions
- Mail is encrypted, and Apple won’t scan it to display advertisements.
- Maps does not require users to sign in, and trip data is segmented to prevent Apple or other parties from tracking your travel.
- The Safari browser on the phone turns off third-party cookies by default, and prevents suspicious sites from loading. Private browsing mode can hide your identity from websites and does not save your browsing history.
- Voice-related data used for Siri and Dictation are not associated with your Apple ID.
- Apple Pay does not store credit card numbers, and does not pass them to merchants.
- Data collected by the Health app is encrypted, and app developers are restricted how they can use it.
The list of iPhone security safeguards goes on, from encrypted FaceTime calls to randomized Wi-Fi access. While many of the features are obscure and you may never directly interact with them, you will probably want to activate basic security options, such as a passcode, Touch ID, and Find My iPhone.
For more information on how to do these steps, go the Settings app on your iPhone and follow the instructions. My book, iPhone 6 & iPhone 6S In 30 Minutes also covers basic iPhone security settings.
The following post about how to use Siri is excerpted from the book iPhone 6 & iPhone 6S In 30 Minutes by author Ian Lamont.
Pay close attention. You’re about to discover one of the coolest, most useful features on your iPhone. Even if you’ve tried Siri before, read this short section about how to use Siri — I guarantee you’ll learn some new uses you didn’t even know were possible.
What is Siri?
Siri is a virtual assistant that helps you find information and data using your voice. It can also launch apps. If you have your iPhone with you and it’s connected to Wi-Fi or a high-speed carrier network, do this right now:
- Hold down the Home button for about two seconds.
- The screen will turn black, a shimmering audio waveform will appear, and the phone will vibrate, signaling Siri is ready.
- In a clear voice, say “Find the nearest supermarket.”
Siri will make a tone, and a computerized voice will announce and show what it has found:
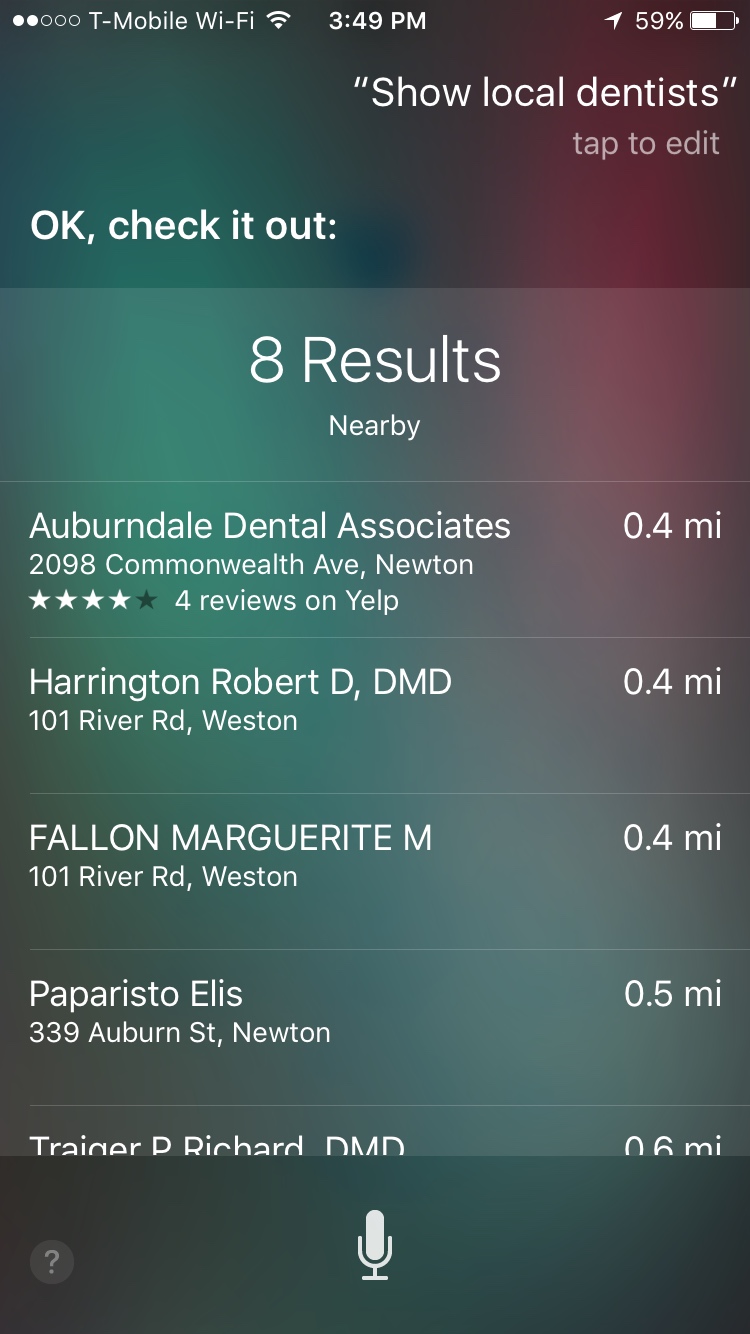
Results can include definitions, Web pages, maps, and other information. Taping a single result will display more information.
If you don’t see Siri when you hold down the home button, go to Settings > General > Siri and make sure it’s turned on. You can also change the gender of the computerized voice, as well as the language Siri uses.
How to use Siri to perform simple tasks
Siri is not only futuristic, but also cuts down the time required to find directions, set up meetings, and perform many other tasks. Here are some of the things you can do with Siri:
- Call a phone number in your contact list (“Call Jill Smith at home”).
- Check email (“Check email”).
- Compose email and text messages (“Email Jim Smith”/“Send a message to Jim Smith”).
- Post to social media (“Post to Twitter”/“Post to Facebook”).
- Check the weather, local movie listings, and sports scores (“What’s tomorrow’s weather”).
- Review calendars and make appointments (“Check appointments”/“Make appointments”).
- Get directions (“How do I get to Main Street from here”).
- Find local restaurants and read the reviews (“What’s the nearest Chinese restaurant”).
- Create alarms (“Set alarm for 8 am tomorrow morning”).
- Play music and podcasts (“Play ‘Beat it’ by Michael Jackson”).
- Search the Internet for information (“What’s the capital of Australia”).
- Crack random jokes (“What is the meaning of life?”).
Siri isn’t perfect. In fact, it frequently stumbles. While researching this book, posing the question “Where is the nearest post office” displayed a local packaging service instead. At other times, Siri may not respond, or may announce that it cannot be used. It also requires Wi-Fi or a fast carrier signal.
Nevertheless, Siri is a huge time saver, and in recently years it has gotten much “smarter” about predicting what information users are looking for. Learn how to use it!
The following post about using the iPhone cursor to perform copy, paste, delete, and other functions is excerpted from the book iPhone 6 & iPhone 6S In 30 Minutes by author Ian Lamont.
If you own an iPhone you may be wondering how to place the iPhone cursor on the screen, and perform other text actions that usually involve a mouse or a physical keyboard. This post covers the basics, and includes some screenshots which show exactly how to use the iPhone cursor and functions like copy, paste, and delete.
Tapping your finger in any area that allows text input (such as the search field on the Web browser, the Messaging app, email fields, etc.) brings up a virtual keyboard, which covers the bottom ⅓ of the screen.
For instance, if I were to compose an email I would open the email app, tap the new message icon, and would then tap my finger in one of the available fields (To, Subject, etc.) to begin typing. Because each of these fields requires text or numbers, the virtual keyboard automatically appears.
Placing the iPhone cursor in the middle of a word or sentence
To place the iPhone cursor on another part of the screen (for instance, to add or delete text in the middle of the sentence) follow these instructions:
- Hold your finger on the place on the screen where you want to place the cursor.
- A magnifying glass appears under the finger, showing the text and the placement of the cursor (see image, below). Move your finger down slightly to get a better view, but don’t let go.
- Move to the left or right to move the cursor.
- When the cursor is placed where you want it, lift your finger.
- Add or delete text as needed using the iPhone’s virtual keyboard.

How to select, copy, and paste text using the iPhone cursor
It’s also possible to select a word or phrase. Tap and hold a word for about one second, or tap the word twice in quick succession. The word will be highlighted, with two handles on either side and a menu above:
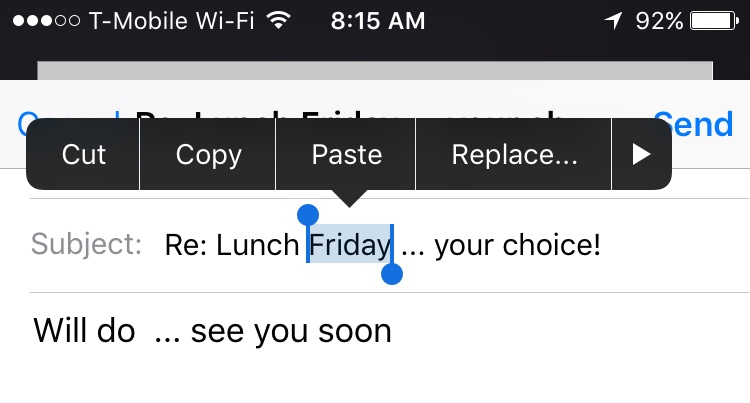
- Pull the the handles to increase the size of the highlighted text, or select All.
- Copy or cut the text (you can paste it somewhere else later by double-tapping where you want to insert the text).
- Other options may be shown, including formatting and inserting photos into emails.
I grew up in a house with a rotary phone, and remember when making a call outside of the home entailed dropping a coin into a grubby public phone.
How times have changed! Practically everyone carries a smartphone, and the simple act of placing a call now requires lots of extra tapping (except when using Siri — which I discuss in Chapter 2 of my book iPhone 6 & iPhone 6S In 30 Minutes). This post will cover some phone app basics, and show some shortcuts which will save you lots of time when it comes to making calls and organizing contacts. Importantly, it will show what all of the extra iPhone Phone app icons actually do when you tap them.
Tapping the green phone icon opens the Phone app. iPhone 6S and 6S Plus owners can also use Peek (a light press on the Phone app icon on the Home screen) to call favorite contacts.
iPhone Phone app icons explained
Once the app is open, use Keypad to make calls on the fly, but you have other options, too:
- Favorites shows a list of contacts you have marked as favorite (when editing a contact, tap Add to favorites to place it on the list).
- Recents will list the most recent incoming calls. Tap the name or number to call the person back.
- Contacts brings up your contact list. If you have added Gmail, Yahoo, or Exchange/Outlook accounts to your iPhone, and enabled the associated contact lists to be shared, those will show up in Contacts, too.
- Voicemail shows a list of recent voicemail messages. Tap Edit to delete specific messages.
After you have entered the number and pressed the phone icon to start the call, the screen will show other iPhone Phone app icons:
iPhone phone app icons change after the number is dialed.
Mute. Turns off the microphone. Tap the microphone icon again to turn it back on.
Keypad. Brings up the keypad, in case you are using an automated system that requires additional input.
Speakers. This creates a hands-free speakerphone, useful for driving, simultaneous typing, or other situations.
Add call. Lets you create a conference call by joining other numbers to the current call.
FaceTime. Switches to the FaceTime app, which includes video. The other party will need to have a FaceTime account for this to work.
Contacts. Displays saved contacts.
You can also press the Home button to do other things (check the weather, take pictures, play Battle Monkeys, etc.) while you talk. A green bar will appear at the top of the phone’s screen while a call is in progress; tap it to return to the phone interface.
This post was excerpted from the book iPhone 6 & iPhone 6S In 30 Minutes by author Ian Lamont.
For owners of new iPhones, one of the most irritating distractions is the “ding” the phone makes when a new email is received. The second most irritating email sound: the “swoosh” when an email is sent. This short blog post and video explains how to turn off iPhone email sounds, as well as the ringer volume, vibrations, and other audible distractions. It also shows how to choose replacement sounds in iOS. The video shows an iPhone 6S Plus, but it works for any iPhone running iOS 8 or iOS 9, including the iPhone 5 and other iPhone 6 models.
By default, the receive email and send email sounds are “on.” This is not an issue if you don’t send or receive a lot of email, but wait until you hook up your work or school email accounts — the phone will be constantly dinging and swooshing!
How to turn off iPhone email sounds – method #1
First, to silence your phone it’s very easy to use the Mute switch on the left side of the iPhone’s case, as well as the adjacent volume controls. But the problem with that approach is it turns off the sound for everything, including the ringer, the keyboard clicks, app sounds, music, etc.
How to turn off iPhone email sounds – method #2
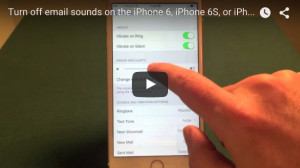 A better approach is to just turn off the sounds you don’t need (or change them to something you like):
- Open up Settings
- Select Sounds
- Change volume settings, or choose individual sounds for specific actions (sending email, calendar alerts, etc.)
- At the top of the list choose None to turn off that sound. Nothing else needs to be done. The sound will be disabled going forward.
- To choose another sound, select from the list. Classic sounds are in a separate submenu.
The video below shows how to turn off iPhone email sounds, using an iPhone 6S Plus running iOS 9:
For more information and helpful tips, check out the book iPhone 6 & iPhone 6S In 30 Minutes.
If you are interested in purchasing a new iPhone, you may be wondering what’s the difference between the classic iPhone 6 and the iPhone 6S. They look the same, but under the hood there are some notable differences, including faster hardware, better cameras, and new touch screen actions. This post will explain what is 3D Touch, and give some examples of 3D Touch in action.
What is 3D Touch: The short version
In a nutshell, newer iPhone 6S and 6S Plus models have additional touch screen actions, which Apple collectively calls 3D Touch. What does it do? In a nutshell, the touch screen on these models is able to differentiate between taps, light pressure (Peek), and heavy pressure (Pop). Peek generally previews content or provides additional options, whereas Pop will open the content.
Here are some examples of how Peek and Pop work:
- From the Home screen, light pressure on an app icon will reveal a menu of Quick Action options for that app.
- When reviewing the list of email in your inbox, light pressure on a particular message will preview it, while heavy pressure will open up the message.
- While browsing photos and videos in the Photos app, use Peek on a single image open it up to preview.
- From your list of contacts, Peek will let you quickly mail, message, or call that person.
- In Maps, use Peek to preview a business or organization, share its location, start driving directions, or call the listed phone number (see image, below).

What is 3D Touch – Peek example
However, there are some drawbacks to 3D Touch:
- It takes some getting used to. Press too hard or too soft, and 3D Touch may not work as expected.
- Apple Apps widely incorporate 3D Touch, as well as some widely used apps (including Instagram) but not all apps support 3D Touch.
- For certain apps, there does not seem to be much of a point to Peek or Pop — for instance, why bother using 3D Touch to preview or open a photo when it is already so easy to use the touch screen to open it?
- It’s usually not clear what apps use 3D Touch, which makes it a waste of time to test it out.
Nevertheless, some apps are really improved by the addition of 3D Touch, such as Contacts. Some third-party apps are also incorporating the technology, such as Instagram.
If you own an iPhone 6S or iPhone 6S Plus, play around with 3D Touch to determine which apps work best with the new touch screen technology.
This post was excerpted from the book iPhone 6 & iPhone 6S In 30 Minutes, by author Ian Lamont.
As someone who has owned a number of iPhone models over the years along with various Android smartphone models manufactured by LG, Samsung, Xiaomi, and others, I am aware of the quirks that can mystify users switching from Android to the iPhone. This blog post covers some of the issues that may amuse or confuse owners of new iPhone models, including the iPhone 8 and iPhone X, as well as older models such as the iPhone 6 and iPhone 7.
Switching from Android: What to expect
Moving from Android to iOS is a bit like moving from the U.S. to England. People speak the same language, but the accent is different and they use funny terms for trucks and toilets. Here’s a quick rundown of what to expect if you are switching from an Android phone to any iPhone model:
- Basic touch screen motions are similar, but Apple has several new ways of using the screen.
- The app stores generally work the same way on each platform, but users must establish an Apple ID to use the Apple App Store — Google Play accounts won’t work.
- If you paid for an app on Android, and you want to have it on your iPhone, you will need to repurchase it for iOS.
- Registered accounts (for Facebook, Amazon, etc.) can usually be used on either platform, but if you’ve changed phone numbers you may need to update your account on the Web before reactivating the account on the iPhone app.
- Most Android phones have extensive customization options, through system settings, app settings, and special utilities. Apple restricts extensive customization, however.
- Many Android phones have removable or upgradable storage. iPhones do not.
- You may need to get a new SIM card or go through a special process to carry over a phone number from Android to the iPhone 6. Check with your carrier for details.
I have included additional Android vs. iPhone comparisons in iPhone Basics In 30 Minutes, plus advice how to get around/deal with the differences. Feel free to add your own comments/observations below.